return to homepage
return to updates
Making Damar Varnish
by Miles Mathis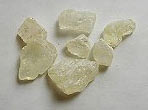
Here is my recipe for making varnish. It is pretty much the standard recipe, but I have a few tips that may help you.
For damar varnish you only need three things. Damar crystals, real turpentine, and white beeswax. Buy the most colorless crystals you can find, and always buy them in a clear bottle, so that you can see what you are getting. This is especially important if you are not using a brand that you already trust from many past purchases. Supplies of crystals change all the time, so even old suppliers can hit you with new stuff sometimes. If you have to order through the mail or internet, trust suppliers who you already trust for other materials, like Old Holland or Schminke. This is just a generalization though. Buy in small quantities if you are trying new things, so that if you get bad stuff you are not stuck with a huge amount of it. Conversely, if you are shopping in person and find some really great crystals, buy a lot.
Impurities in the crystals don’t matter as much, if they are the sort that will filter out. You just don’t want crystals that are too brown overall, since you can’t filter that out. Little dark specks of non-resin will sink to the bottom and you can decant those out. They are just pieces of dirt or bark or something. But dark resin will make darker varnish and you don’t want that.
You must use real turpentine, not turpentine substitute, odorless thinner, or anything else. You can use hardware store turpentine if three things are all true: 1) The container says “pure gum spirits of turpentine.” That is the required US designation, or was when I was learning these things. 2) You do a smell test. You have to take the lid off at the store and actually smell the turpentine. If it smells sweet and natural, you are fine. If it smells like anything else but sweetest turpentine, don’t buy it, no matter how expensive it is or how it is labeled. This also applies to artist grade turpentine. Always do a smell test. Your nose is always smarter than any label. Labels can lie, but your nose is your own and you can trust it. 3) The turpentine is completely clear.
I actually prefer to use hardware store turpentine, provided I have done the smell test. The reason is that really good hardware store turpentine smells better and is weaker than the expensive “rectified” stuff you get from the art suppliers. Artist grade turpentine may be slightly purer in some cases, and in all cases it is stronger, but you don’t need that extra strength. The refining process (distillation) does three things: it makes the turpentine a bit stronger solvent, it removes any impurities, and it changes the smell. A side effect of the first thing is that rectified turpentine evaporates faster than hardware store turpentine. But you don’t want that either. Rectified turpentine is too strong, evaporates faster, and smells worse. It is more likely to dissolve underlying paint layers, it gets into the air faster, and it is more irritating to the body. For all these reasons, I recommend hardware store turpentine, if it passes all tests. The last test it passes is the price test, since it is about one-third the price. Suppliers will always recommend you buy artist grade turpentine, but this is just because they want your money.
Of course, it goes without saying that hardware store turpentine can also be garbage. Learn to do the smell test and trust your nose.
You must use real white beeswax, not paraffin or any other synthetic wax. It shouldn’t be expensive, and if your art supplier is charging a lot for it you can get it from other places. Art suppliers tend to mark everything up just because it is an art supply. Learn to get around this. The best way is to remember that there are other uses for many of these things, and you don’t have to shop at art supply places. You can get raw canvas at Clothworld, you can get linseed oil at grocery stores, you can get beeswax at lots of places. Same goes for chalk, marble dust, wood for panels and stretchers, and so on.
You can make whatever amount of varnish you want. All you need is a couple of clear glass jars and some cheesecloth (you can even do without the cheesecloth). You can use old spaghetti jars if you want.
The basic recipe is called a five-pound cut, which is five pounds of crystals to one gallon of turpentine. That is 1.25lb/qt or .625oz/fl.oz or 3g/5ml. Just put the crystals in the cheesecloth and dunk them into the turp. You can tie a string to the cheesecloth to help you remove it later, if you want. Or you can just put the crystals straight into the turp. The cheesecloth will catch some of your impurities, but it will also create a big mess and soak up a bit of your varnish.
When the crystals have dissolved, slowly decant from the original jar to a new jar, leaving the dregs in the old jar. Make sure the new jar is clean and completely dry. Dry the inside of the jar thoroughly after you wash it. You don’t want any water in your varnish.
You now have varnish, but it is at least twice too thick to use for art. You need to dilute it one to one with more turpentine for a final varnish. You dilute it one part original batch to two parts turp for retouch varnish.
If you want to try the wax varnish, just melt a sugarcube size bit of white beeswax into a cup of varnish. Then try it on a study painting that has darks in it. If the varnish is still too shiny for you, add more wax. If it is too matte, add more varnish to the mix. I like just enough wax to knock off the glare, but not enough to go matte.
You can heat the varnish on the stove, but keep the temp low and do not use a cover on the pan. Just enough heat to melt the wax and no more. Turp is flammable you know. It’s auto-ignition temp is 250C or 480F, which is quite high, so you shouldn’t be too worried. Just exercise normal caution. Do not smoke while you are doing it.
To apply varnish, use a soft brush like horsehair or a Chinese hake. Hake is great because the hairs are very white and when one falls out you can see it immediately in the varnish and remove it. Hake is also very cheap. Lay the painting flat with raking light. Apply thinly and quickly. The varnish will get sticky quite fast. If it is too sticky from the beginning, you have it too thick in the mixture. Always better too thin than too thick, with varnish. You can always apply another thin coat later, but it is beastly difficult to remove varnish. You don’t ever want to have to do it. Better to varnish three times with retouch than to get your first coat too thick.
Let the varnish dry for a month and then check it again. If your mixture was too thin, you may need another thin coat. You will be able to tell because your blacks will have gone flat again. That means you don't have enough final varnish on those spots. It is usually best to put another thin coat on the whole thing than to try to spot varnish. Spot varnishing causes variations that will be noticeable in bad lighting conditions.
Here is a good trick to keep dust out of your varnish while it is drying. Vacuum all the dust from the top of a bookshelf or table that sits against a wall. Vacuum the wall, too. Lean the painting varnish side in against the wall, on the table. Lean it at an angle, so that only the top edge would touch the wall. Then turn it just a fraction, so that only one corner at the top touches the wall. This keeps the top edge from sticking to the wall or from getting varnish on the wall.
This position keeps dust from settling into the varnish during drying. Dust is falling in a house all the time, and varnish will capture it like glue. It is best not to do this leaning trick on the floor, since dust is getting stirred up on the floor all the time. Do the leaning trick on a table or bookshelf that won’t get any use for a day or two.
Adding wax will make your varnish
dry faster and harder. If you don't add
any wax, your varnish will be sticky for a while and may even melt a bit in
very hot weather. For this reason I
recommend adding a small amount of wax, even if you like high gloss. Use half a sugarcube of wax in a full cup—even
this much will strengthen your varnish, without matting it out. I use more like a full large sugarcube per eight ounces, perhaps even a bit more. Not all crystals are created equal, and not all wax either. You really have to prepare each batch by feel. Resin that is especially shiny and sticky will require a fraction more turp and a fraction more wax.
I want to close by saying something about sunken-in areas, especially darks. Your darks are supposed to sink in. If your darks are not sinking in, your paint is too oily or you are using too much medium. Very oily blacks and browns are dangerous, since they will crack. Not maybe; definitely. A lot of my students think they are doing something wrong if their paint layers go flat when they dry. But they are doing something right. It is those people who use too much medium or too oily paint that are doing something wrong. The people who use 25% Maroger solutions to increase gloss, and so on.
If you don't believe me, remember the importance of varnishing day in the past, at the Paris Salon for instance. Why was varnishing day so important in the past? Not because it allowed everyone to get together and talk about eachother. No, it was because all the artists got to see their paintings looking their best again. After months of looking at unsightly sunken-in areas and dried out colors, the artists brought all the saturation up to original levels. The paintings once again looked like they had when they were wet. The artists are reminded that they actually did a good job. Confidence soars.
But these artists had to have the self-confidence to wait. They had to weather those months, because there is no technical way around them. There is no safe way to have unvarnished paint that looks like varnished paint. You simply cannot varnish immediately. Everyone knows that. But you also cannot substitute medium for varnish. You cannot sneak the varnish into your medium and think you have performed a great trick. Using lots of Maroger is the attempt to cheat, to cut this corner. But it won't work. It may allow you to ship paintings to the galleries almost immediately, but at the cost of permanence. The same is true of other mediums besides Maroger. Any paint that is so full of any kind of oil or resin that it doesn't sink in when it dries is bad paint. Most contemporary brands of paint are already so oily that they are non-permanent, and this includes major artist quality brands like Mussini and Rembrandt. Every decade these paints get oilier, until now they are sub-student grade. Twenty years ago I recommended some of these brands. I don't anymore. And yet I see artists adding medium to these paints! That is like adding sugar to cherrycoke.
Young artists are taught to seek out "buttery" paint. But you don't want buttery paint. Buttery paint is paint with too much oil. It is the manufacturers who recommend buttery paint, since that is what they make. Artists should seek out the stiffest, heaviest paint possible. They can then manipulate this paint into whatever they like, from a superstiff scumble to a thin glaze.
Buttery paint is just for the super-lazy, who want the medium already in the paint. They don't want to have to think or to have to learn anything. They don't want to have to learn about scumbles or glazes, they just want to slap on the same sort of paint for any occasion. Don't be one of these artists. Avoid buttery paint. Avoid all advice from manufacturers and salespeople.
If this paper was useful to you in any way, please consider donating a dollar (or more) to the SAVE THE ARTISTS FOUNDATION. This will allow me to continue writing these "unpublishable" things. Don't be confused by paying Melisa Smith--that is just one of my many noms de plume. If you are a Paypal user, there is no fee; so it might be worth your while to become one. Otherwise they will rob us 33 cents for each transaction.